
Getting Started with Tech: Undergraduates
Activate NetID
Rice students receive a student number (e.g., S01234567), primarily used for student identification, and a NetID (e.g., abc123), which is your unique login credential for most digital resources at Rice.
- New students admitted for the upcoming fall semester: You will receive an email about how to activate your NetID after completing the acceptance process in late April or early May.
Your NetID is established within 24 hours of your acceptance of employment, your graduate student department acceptance, or your undergraduate student status (~early May after all deposits are received).
To activate your NetID, please follow the steps below:
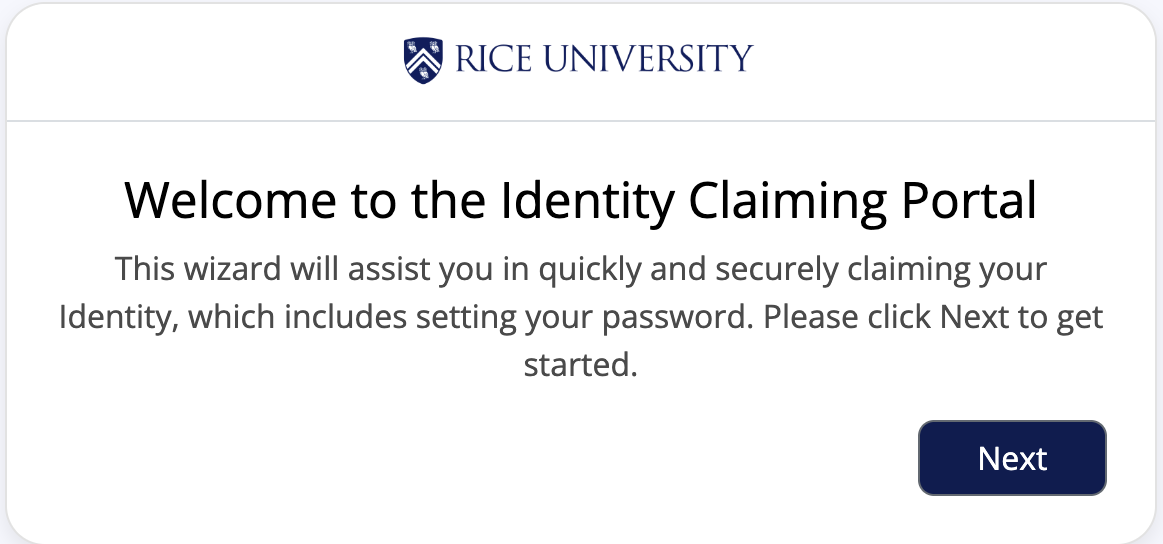
Go to the Online Account Management System, https://whooru.rice.edu/claim/initial. On the Identity Claim Portal screen, select Next.
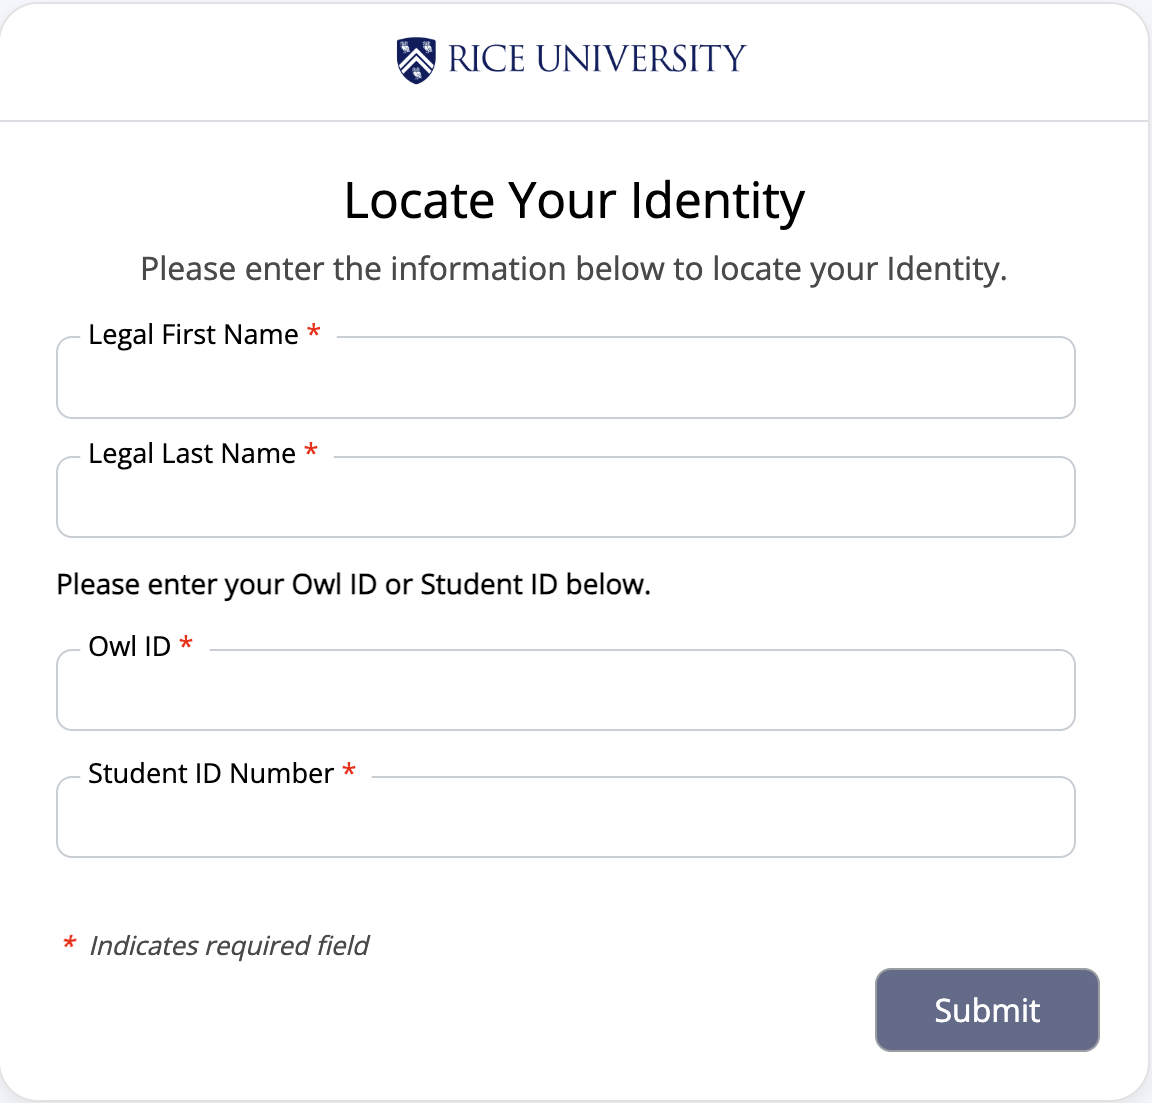
You'll be asked to give your legal first and last name, which should match the name given to the Office of the Registrar or Human Resources, and your Rice Owl ID or Rice ID number (provided in your welcome email). Then select Submit.
During your NetID account activation, you will be guided through the Duo Enrollment process to set up your multi-factor authentication (MFA) access methods. Please follow the on-screen prompts to continue.
NOTE: The NetID activation process can only be completed once, and an error message will appear if you have already activated your NetID.
Your NetID will be displayed on the page to set up your password. Please be sure to make a note of your NetID. In the example below, lt63 is the NetID.

After successfully setting up your NetID password, you will receive a message that your Identity Claim has been completed. You will be redirected to the login screen and prompted to sign in with your new credentials.
Once your account has been set up, you can access your Rice email through Rice Google Mail. To learn more, see here: Google Workspace for Education.
Need Help?
If you encounter any issues or need help activating your NetID, please contact the TS&S Service Desk.
How to Reset Your NetID Password
If you have forgotten your NetID password and know your NetID, you are able to set a new password at WhooRU.rice.edu.
At the time you log in to WhooRU.rice.edu, you'll be prompted to sign in using Rice Single Sign On (SSO).
On the Rice Identity Provider page, select the Forgot your password hyperlink.

This will take you to the Password Reset Portal page.

When you’re ready to begin the password reset process, click Next. Enter your NetID, Legal Last Name, and then submit.

Verify your Identity by selecting one of the verification options listed on the screen. You can verify via email, text message, or by authenticating with Duo. After making your selection, a message on the screen will appear indicating that your request has been received, and instructions have been sent.
Follow the link provided in the instructions to Continue Forgot Password Process.
Enter your new password following the defined password requirements criteria, and re-enter the password again to confirm. Once completed, you'll be redirected to the WhooRU login screen and prompted to sign in with your newly set password.
If you need assistance throughout this process, please contact the TS&S Service Desk.
Duo for Authentication
Duo, an authentication service also known as two-factor or multi-factor authentication (2FA or MFA), is used for Rice systems that require an additional layer of security and is set up in tandem with NetID activation.
[Doc 151761 content is unavailable at this time.]
What is Duo?
Duo is the tool that Rice uses for multi-factor authentication (MFA). The purpose of this is to improve security and protect resources against unauthorized access or attempts to steal credentials and/or accounts.
How does Duo work?
Duo acts as an additional security layer for authorized individuals to access university systems.
In order to access a service, you must authenticate by providing at least two factors to validate who you are. This is done by sharing:
-
Something you know (e.g., username and password)
-
Something you have (e.g., smartphone or tablet)
In this way, you are required to prove your identity and also confirm that you are in possession of the device(s) that are needed to gain access to university resources. By doing this, you are helping protect Rice systems against cyber attacks.
Why is Duo important?
Hackers are constantly on the hunt for credentials to steal and accounts to exploit. Due to the increase in the number of these attacks, it is critical to ensure the safety and security of Rice’s data and systems. With Duo, we can ensure that critical university systems are only accessed by authorized users.
How to Enroll in Duo
At the time you activate your NetID account, you will automatically be taken through the Duo enrollment process. The NetID activation process can only be done once by an individual.
If you’ve been at Rice for a while and have never set up Duo, log in to WhooRU with your NetID and password to start the enrollment process.
Duo Authentication Methods
The authentication methods are how you will choose to authenticate your identity when accessing university resources. Please see the table below to review the methods that Rice currently supports in order of most to least secure.
| Authentication Method | Category | Security | Description |
|---|---|---|---|
| Platform Authenticators | PASSKEY | VERY STRONG (5) | Apple Touch ID / Face ID/ Windows Hello |
| Roaming Authenticators | PASSKEY | VERY STRONG (5) | WebAuthN tokens (Yubikey / 1Password / Apple Keychain / Google Chrome Password Manager) |
| Duo Mobile push approval | PUSH | STRONG (3) | Duo Mobile App Push |
| Duo Mobile generated passcodes | PASSCODE | STRONG (3) | Duo Mobile App Passcode |
| Hardware token passcodes* | PASSCODE | STRONG (2) | Hardware token (OTP) |
| SMS Passcodes | SMS | WEAK (1) | SMS delivered passcode |
| Phone Call approval | VOICE | WEAK (0) | Telephone call with voice prompt |
| Backup Codes | PASSCODE | WEAK(0) | Only used for Emergency Access |
*Limited availability
If you wish to learn more about all other authentication methods Duo supports, please visit: Duo Authentication Methods
Duo Device
A Duo device allows you to respond to the authentication requests sent by Duo when accessing university systems. The following devices can be configured to authenticate with Duo:
- Duo Mobile App -- (supports PUSH, PASSCODE)
- iOS
- Apple Watch
- Android
- Cell phone and landlines (supports SMS, VOICE)
- Hardware Tokens (supports PASSCODE)
- Touch ID (supports PASSKEY)
Duo Backup Codes
Duo backup codes allow you to save a number of one-time use passcodes that will allow access when other Duo authentication methods do not work. It is always a good idea to generate and store these backup codes for instances where you have trouble with the other Duo authentication methods. Be very careful with these passcodes because they do not expire, and if someone else gets access to them, they can access your accounts just like you do.
You can generate new Backup codes by logging into WhooRU.rice.edu and visiting the My Security page. Under the Duo Bypass Codes header, there is a button labeled Generate Codes, that will create new passcodes and display them on the page. Once you do this, the button Print Bypass Codes can be used to save the list for later use.
Important notice about Duo Mobile App passcodes
The passcodes generated by the Duo Mobile App, act similar to the Duo Backup codes. However on November 17th 2025, Rice is changing the way that the Duo Mobile App passcodes behave. The Duo Mobile App passcodes will expire within 30 to 60 seconds after they are generated by the Duo Mobile App whether they are used or not. This means that these Duo Mobile App passcodes will no longer be usable as Backup Codes. If you require a one time use passcode that does not expire, you must generate them using the Duo Backup Codes method in WhooRU.
FAQs
Q: Which Rice Systems use Duo?
A: The following systems use and require Duo for multi-factor authentication
-
WhooRU – Rice’s online account management system
-
VPN – Virtual Private Network
-
Google Workspace – Gmail, Calendar, Google Drive, etc.
-
Microsoft 365 Services – Outlook, Teams, OneDrive.
-
iO – Employee and financial services system
-
WordPress – Blog site hosting
Q: How many devices do I need to configure for Duo?
A: You will only be required to set up ONE Duo device during the enrollment process. However, it is always recommended that you set up multiple (at least 2) devices that are capable of responding to Duo prompts for authentication. For example, if you're unable to use one device due to some platform or website settings, you are able to use the other device that has been configured for access.
Q: What method should I use to authenticate?
A: The authentication method(s) used are based on individual preference. However, it is highly preferred that you use methods with a security score of 2 or 3 or higher for normal, everyday use.
Q: How can I change my authentication method?
A: If you do not want to use the method Duo automatically suggests for that application, cancel the Duo authentication in progress and click or tap Other options. Then, select the method you want from the list. If you have not set up Duo Mobile, then the Duo prompt may automatically select your next available option, following the most to least secure preference order.
Q: What's the difference between the authentication methods I use?
A: The difference between the authentication methods used is based solely on the level of security. For example, it is recommended for individuals to use more secure authentication methods when authenticating to university systems.
Q: I've already activated my NetID, but I want to update my authentication method for Duo. What do I do?
A: If you already have your NetID, you can update the devices that you use for Duo authentication in the WhooRU online account management system. This will allow you to update the device information that Duo sends. The settings for your preferred method(s) of authentication can be found in the Duo Mobile application.
Q: I have been at Rice for a long time, and I've never set up Duo. What do I do?
A: If you have never set up Duo, go to WhooRU.rice.edu and step through the Identity Claim process. You will be required to configure your device and select the authentication method to gain access to University systems.
Q: I'm traveling internationally and need to access University resources during my trip. How do I need to prepare?
A: Before your trip, make sure to have the device(s) you plan to use on your trip enrolled in Duo. If you have a cellular connection or WiFi, you can authenticate as normal using the methods you prefer. Otherwise, if you know that you will not have cellular service or WiFi, you can generate up to ten (10) bypass codes that can be used for the duration of your trip.
Duo: Using Duo while Traveling
Duo offers multiple options to meet your needs when traveling. It is suggested that you enroll in any device you plan on using before your trip.
Options
- Even without cellular service or a WiFi connection, you may use the Duo Mobile app to generate a passcode that you can use for authentication. Simply choose the Enter a Passcode option when you get the Duo authentication prompt. To generate the passcode, open the Duo Mobile app on your phone and tap the button with the Key symbol.
If you are unable to have a smartphone during your travel, it is possible to get 10 one-time-use bypass codes that you can use for Duo Security authentication for the duration of your trip. You can generate these by going to your Online Account Management System, selecting Two-Factor Authentication on the left menu, and select Generate Bypass Codes at the bottom of the page. Each time you click this button, new codes will be generated and previous codes are invalidated.
If you have cellular service or a WiFi connection, then you can simply use whatever authentication technique you normally use. The push, passcode, and phone options all work out of the country. You can even add an international phone number as one of your authentication options.
Restrictions
The Duo app and hardware tokens are subject to export control regulations. According to federal export control regulations, the Duo app and hardware tokens may not be transported or sent to embargoed nations identified by the U.S. State Department.
Sanctions Programs and Country Information
Here is a dated list from August 2019:
- Cuba
- Iran
- North Korea
- Sudan
- Syria
- Venezuela
If you are traveling to any of those countries, delete or uninstall the Duo app from any devices you will take with you, and do not take Duo hardware tokens with you.
Duo: Authentication Categories
Categories
PASSKEY
The PassKey methods are phishing-resistant and cryptographically strong. The credential can only be shared with the website that it was configured with.
PUSH
The Push method sends a message to the Duo Mobile app running on your smartphone, which causes it to produce an immediate pop-up notification and only requires clicking an Accept or Decline button. This is by far the easiest method with which to interact with the Duo 2FA process, but it requires running the Duo Mobile app on your smartphone and an active cell or wireless connection.
PASSCODE
The Passcode method is a six-digit number that can be entered into the Duo Prompt. The Duo Mobile app running on your smartphone can generate this passcode for you. This passcode number can also be generated by a Duo Hardware Token. The passcode method does not require an active cell or wireless connection.
SMS
The SMS method will send a passcode to your cell phone as an SMS message. You can then enter this number into the Duo Prompt. The SMS method can be used on non-smart phones, though this is one of the weakest in terms of security. The SMS method requires an active cell connection.
VOICE
The voice method will call your phone and ask you to approve or deny the request by pressing a number on the phone. This option can be used with landlines. Like the SMS method above, this is the weakest in terms of security. The VOICE method requires an active cell connection if used with a mobile phone
Category Security
0 = Weak
5 = Strong
2 or higher is acceptable for normal use; 3 or higher is preferred.
Duo and Other Systems
Duo and bitvise
Bitvise is an SSH client for Windows that supports graphical and command-line file transfer, terminal sessions, and tunneling.
The clear systems make use of DUO Two Factor Authentication to assure login and authentication integrity.
To use Bitvise with DUO you must use the "keyboard-interactive" method for authentication. This keeps the session interactive throughout the whole authentication process.
Duo and vscode on the clear systems (short writeup)
- In vscode, go to Extensions (four square blocks) on the left edge
- Access the "Remote - SSH" extension pack
- Access "Remote - SSH" settings (the gear icon in the Remote - SSH window)
- Select "Extension Settings” from the drop-down menu
- Change the following to yes (a checkmark):
-
- Lockfiles in Tmp
- Remote Server Listen on Socket
- Show Login Terminal
- All other values can stay as they are.
To see the longer version of these steps, please visit this KB: Remote vscode on the CLEAR systems
Resources and More Information
Usage
Authentication
NOTE: Duo automatically defaults to using the most secure authentication method you defined on first use. Afterward, it will default to the last one that you used.
Guide to Two-Factor Authentication
Backup and Recovery
Duo Universal Prompt
You will see the Duo prompt when trying to log into a protected application or web browser.
Duo Universal Prompt (full guide)
Device Management
Duo adding or managing devices after enrollment
Travel
Access Denied. Duo Security does not provide services in your current location
Enrollment
WARNING: The enrollment process will only require you to define ONE Duo device. For best practice, it is always recommended to set up multiple (2 or more) devices capable of responding to Duo, such as an Authenticator or the Duo Mobile App on your smartphone.
Additional Resources
Need Help?
Please contact the OIT Help Desk.
Connecting to the Rice Network
Rice Gmail
- Google Workspace for Education provides access to email and calendars, Gemini, and other collaborative workplace apps, including Drive, Docs, Sheets, Slides, Sites, Groups, Contacts, Keep, Chat, and Meet.
Complete Guide to VPN
Please log in to the KB with your NetID to view the content for this software or service. Thank you!
Rice's VPN provides secure data transport between the university network and a remote computer not on the Rice network, allowing you to access Rice's network resources while off-campus. Duo Authentication is required when setting up and using VPN.
Esther
Canvas
- Rice Canvas: Canvas login and student resources
- Canvas FAQ: Commonly asked Canvas questions for students
Zoom Licensed (Pro) Account
Contents
Notes:
- When logging into Zoom via single sign-on (SSO), campus users will be auto-provisioned a standard Zoom Licensed (Pro) account
- Please keep your Zoom software updated for the latest security fixes.
- Faculty, staff, graduate students, and undergraduate students have Zoom License accounts.
- Learn more about Zoom Cloud Recording and Zoom Cloud Recording Retention Policy.
- Issues? Check the status of Zoom at Zoom Service Status.
- Google Meet is the recommended backup tool for virtual meetings accessible through the Google Workspace for Education platform.
Login through Application
Step 1: Download Zoom.
Step 2: Launch the application and select Sign in.

Step 3: Select option: Under the options of "or sign in with," choose SSO.

Step 4: Authenticate your identity by entering your NetID username and password.
Step 5: Follow the instructions on the browser, enter (if needed) riceuniversity.zoom.us and select Open zoom.us.

For more information regarding the features of the Zoom application, go to the Zoom website.
Through Application:


Login to Zoom using a web browser
- To Join, Host, or Sign in to Zoom, open the browser to: https://riceuniversity.zoom.us/
- Sign in with your Rice NetID and password

Best Practices for Video Conferencing
The suggestions below will promote successful online video conferencing experiences.
Technical Recommendations
- Run a system check prior to your first meeting each week to ensure you have an up-to-date browser and conference software. Update Zoom software frequently.
- Reboot your computer regularly to ensure your computer is up-to-date and to minimize technical issues.
- Minimize the number of programs running during a meeting, especially those that use internet connectivity or notifications.
- Disconnect other devices (such as printers) from the internet while you are on a video conference.
- Use a computer, instead of a smartphone, so you have a larger screen to see your peers, instructors, and shared materials.
Setting Up
- Allow yourself enough time before the start of class or meeting to connect to the live session, both by audio and video.
- Test your microphone and speakers/headset prior to joining a meeting.
- If possible, use a headset or earbuds since computer speakers can cause static or an echo for other people in the conference.
- Position yourself so that the main source of light (window, ceiling light, lamp) is in front or above you. If you are not in shadow, other participants can see you better, which will facilitate better group interactions.
- To avoid excessive feedback noises in online meetings, mute your microphone when you join a meeting and unmute it only when you want to speak.
Etiquette During the Conference
- Speak as if you are face-to-face with the participants and look at the camera to create eye contact.
- Eliminate distractions (social media, texting) during live meetings so you can be fully present and focused with the other participants.
- Please dress appropriately.
- Manage your physical surroundings before video conferencing. Notify people in your immediate surroundings that you are participating in a video conference so they can avoid disrupting you.
- Often conferences are recorded so take steps to prevent violating the privacy of people in your area by warning them. Remove private information from the view of the camera.
Technical Difficulties During the Conference
- If your video is not working, make sure other programs that utilize the camera are not using the camera and are closed, then restart your computer.
- If your audio has problems, turn off the camera to improve connectivity.
- If you are using Zoom and have not updated your software recently, you may need to install the latest version. See also Zoom Meeting Privacy and Security.
- For assistance, contact the TS&S Service Desk.
- Zoom Mobile Application: Tips and Instructions about using Zoom on a phone or tablet
- Zoom Meeting Privacy & Security: Suggested settings for creating private and secure Zoom sessions
- Getting Started: Desktop, Mobile, Training, FAQ, Installation
- Zoom Video Tutorials: Register for upcoming live training or access recent Zoom Videos (Zoom Meetings, Webinars).
- Support: Zoom Help Center
- Training: Weekly Zoom Training webinars; Zoom Video Tutorials
- Zoom In-Meeting Chat:Send private and public messages during a Zoom call
Additional IT Resources for Undergraduates
- Computer Recommendations for Students: Check out our advice for undergraduates on minimum specs required for success at Rice, including links to vendor discounts!
- Support for Personal Computers/Mobile Devices: Rice IT cannot support personal devices. Please check out this article for advice and 3rd-party support options.
- Software Available for Students: List of free and discounted software
- IT Status: Stay informed on IT maintenance and events
- TS&S website: Learn more about Rice's IT offerings on the Technology Solutions & Services (TS&S) site
- TS&S Resources for Undergraduates: Getting started with technology for undergraduate students
- Collaboration and Storage Options: Storage, file sharing, and collaboration resources for students
- Learn more about phishing scams and campus digital security (access requires a Rice NetID and password)
IT Policies and Principles
- Protect your computer, data, and university resources by following the digital security principles outlined in the Security Awareness: Campus Guide (access requires a Rice NetID and password).
- Adhere to and comply with the following policies:
Need Tech Support?
Either visit the student support desk or contact the TS&S service desk.
Visit the Student Support Desk
At Rice, there is a student service desk where fellow students who are trained to help with technology issues provide daily support for the Rice community. To learn more, watch the video below:
Contact the TS&S Service Desk
Service Desk
The TS&S Service Desk is your central contact for IT support and troubleshooting, and our goal is to provide you with an excellent service experience!
We offer both in-person and remote support services, and all requests are associated with a support ticket.
- Hours: Monday - Friday: 8:00 AM - 5:00 PM (excluding university holidays
- Web Form: TS&S Service Request
- Phone: 713.348.HELP (4357)
- Email: help@rice.edu
- Request Portal (NetID login required)
*After-hours support available for urgent issues, please call.